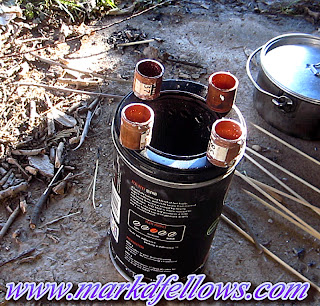
Now a days, I really no longer care about these things, but I was bored, so I decided to try and make one.
I used just a few supplies, and only two tools to make it.
Supplies:
A. One Coffee tin
B. One Chai Tea tin
C. One Leatherman
D. One pink Sharpee Marker
E. One pair of old kitchen scissors(to make the pot holder)
It took me 15 minutes to make. The idea was to not use any modern power tools.
The temperature outside was 32 degrees, and the water was probably 40 degrees when I started it. It took the stove 10 minutes to boil a pot of water, but I think it could have done it faster if I knew that I had to keep feeding it.
It burned very cleanly, once I fixed the problem with the pot holder(pictures as bottom)
Pictures not enough? There is a video on this at the bottom!
Step One
 |
| Cut a hole in the coffee tin lid with a knife that is slightly smaller than the tea tin(inner chamber) |
Clarification
 |
| Make the hole in the lid slightly smaller than the smaller tin |
Step 3
 |
| Poke several holes in the bottom of the inner(Tea Tin) chamber |
Clarification.
 |
| When completed, it should look like this |
Step 4.
 |
| Poke holes all the way around the bottom side of the inner tin about 3/4 inch from the bottom. Make large holes, these(shown( ended up being too small) |
These hole I am putting in the sides of the tins are rather small. It made the stove smoke a lot, and it didn't burn well. It took me 5 minutes to go back with my leatherman, and twist it into the holes to make them larger. Make them as large as you can. Don't break your knife, but you should be able to twist it back and forth to make a decent sized set of holes.
Step 5.
 |
| Add hole at the top 3/4 inch near the open end of the inner tin. Again make the holes large. The ones shown were too small. Turn your knife a little in the hole |
Clarification.
 |
| After your done with the inner tin it should look like this |
Step 6.
 |
| Cut large holes the whole way around, 3/4 of an inch from the bottom of the outer(coffee) tin. |
Step 7
 |
| Place the inner(tea) tin inside the outer(coffee) tin lid |
Step 8
 |
| With your multi-tool push the inside of the steel lid tabs up against the inner tin as much as you can to make a tighter seal |
Supplies and tools used
 |
| One tea tin, one coffee tin, one leatherman, and one pink sharpee(to mark the circle for the hole for the inner chamber) |
ALMOST finished product
 |
| It turned out the pot holder(lid for the tea tin) was too restrictive in its current form |
"Finished" with better pot holder
Results...
 |
| Right before this, it was a strong rolling boil, but I let it calm down because it fogged up the camera lens... |
I actually did the cooking using 4 copper rings I cut out of 3/4 copper plumbing pipe.
Later the same night, I made the following version.
Again, the idea is to use as few tools as possible. I could make a better pot stand for sure with a few machine bolts, and my power drill, but the idea is to do this on the primitive, so to speak...
It took me about 10 minutes. What is that you say? I should have used more time...
Step 1 of the improved pot holder
 |
| First draw a pattern with a sharpee. If you knew Geometry, this would be a snap! I don't know my geometry..... |
Step 2 of the improved pot holder
 |
| Cut the pattern out with your knife. BE CAREFUL!!! |
Step 3 of the improved pot holder
 |
| It's "done" |
Final product
 |
| It actually held the standard pot up pretty well! Looks like garbage, is garbage, but it works! You can cook your hobo stew on it!! |
See the video tutorial at this link, and watch me boil water!
See the free 15 minute wood gas stove VS snow!


Thanks for sharing a nice blog for ! Gas Stoves Gas Stoves .
ReplyDeleteThank you for reading Gasafe!
ReplyDeleteThanks for posting a nice blog for ! Gas Stoves Gas Stoves .
ReplyDeleteThanks for the post Flat Head Stove Bolts
ReplyDeleteNice information of the 15 minute wood gas camping stove.Read more info of camping stoves visit my website http://bit.ly/2sluNNb
ReplyDeleteThis article gives the light in which we can observe the reality. This is a very nice one and gives in-depth information. Thanks for this nice article
ReplyDeletebuy best cooking range price in uae in dubai